Download presentation
Presentation is loading. Please wait.

1
翰尼斯有限公司、CAVE教育團隊 葉律佐 yeh062005@gamil.com 2013.06.14
超級小電腦 Raspberry Pi 翰尼斯有限公司、CAVE教育團隊 葉律佐

2
Agenda Preface: Tell me a story: Raspberry Pi
Session 1: Raspberry Pi Setup Session 2: Linux 基本指令集 Session 3: Scratch in Raspberry Pi Session 4: Python in Raspberry Pi Session 5: 和其它Devices做鄰居:Raspberry Pi的GPIO Session 6: Raspberry Pi + Arduino Session 7: 把 Pi 變多媒體娛樂中心

4
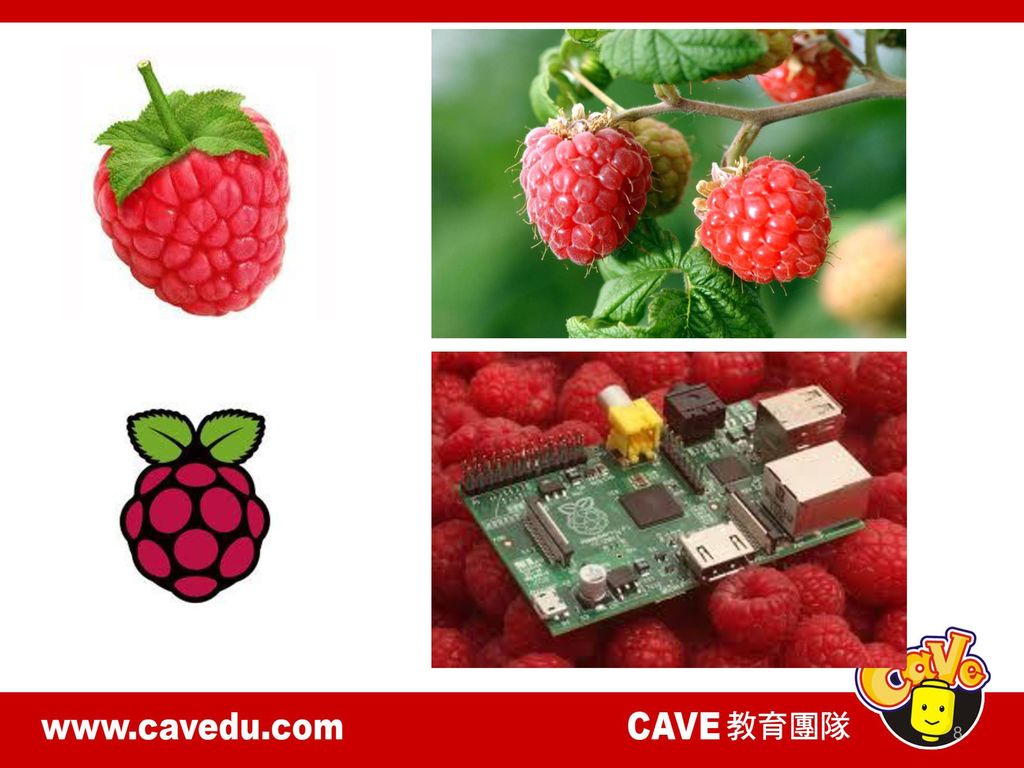
關於樹莓(Raspberry) 的故事 「樹莓」是一棵常綠喬木,非常喜歡陽光,不耐蔭,怕積水的環境,所以必須是排水性良好的土壤,很能耐旱。
她第一次被發現是在1792年由一位蘇格蘭植物學家所收集,並命名為東方草莓樹。 「樹莓」是一株相當知名的蜜源樹,因為她在春末時會開出有蠟質白或粉紅的小白花,有濃濃的蜂蜜味道,是蜜蜂的最愛。 「樹莓」的掛果相當長久須一年左右才能成熟,掛果量相當多,是相當著名的觀果樹,果肉是甜的,可食。

5
樹莓集草本、木本植物優勢於一體,形似草莓卻勝於草莓。
紅樹莓是當今發現的天然鞣化酸含量最高的食物。 鞣化酸是一種能有效預防和治療癌症的物質,對結腸、宮頸、乳腺和胰臟癌等有特殊療效。 因此被世界公認為第三代水果,在國際國內市場上前景極為廣闊,是中國目前調整農業産業結構,發展高效種植業的好專案。

6
The name 'Raspberry Pi' In the early days of Home Micros, there were a number of "Fruit" named computers. Apart from Apple, Apricot(杏) and Tangerine(橘子) spring to mind(映入腦海), Pi is said to be derived from the programming language Python, which was an early runner in suggestions for a suitable "official" language for the Raspberry.
 and Tangerine(橘子) spring to mind(映入腦海), Pi is said to be derived from the programming language Python, which was an early runner in suggestions for a suitable official language for the Raspberry.")
7
以Python為主要程式語言的電腦主機板
Raspberry Pi 以Python為主要程式語言的電腦主機板

9
樹莓派的圖示

11
硬體規格 SoC Broadcom BCM2835 (CPU, GPU, DSP, and SDRAM)
CPU: 700 MHz ARM1176JZF-S core (ARM11 family) GPU: Broadcom VideoCore IV, OpenGL ES 2.0, 1080p30 h.264/MPEG-4 AVC high-profile decoder Memory (SDRAM): 512 Megabytes Video outputs: Composite RCA, HDMI Audio outputs: 3.5 mm jack, HDMI Onboard storage: SD, MMC, SDIO card slot 10/100 Ethernet RJ45 onboard network Storage via SD/ MMC/ SDIO card slot
 GPU: Broadcom VideoCore IV, OpenGL ES 2.0, 1080p30 h.264/MPEG-4 AVC high-profile decoder. Memory (SDRAM): 512 Megabytes. Video outputs: Composite RCA, HDMI. Audio outputs: 3.5 mm jack, HDMI. Onboard storage: SD, MMC, SDIO card slot. 10/100 Ethernet RJ45 onboard network. Storage via SD/ MMC/ SDIO card slot.")
12
軟體 Raspberry Pi使用Linux核心的作業系統
例如Raspbian就是一套修改自Debian且針對Raspberry Pi硬體做最佳化的系統,也是官方所推薦的作業系統

13
作業系統 Android 4.0(Ice Cream Sandwich) Arch Linux ARM Debian Squeeze
Firefox OS Gentoo Linux Google Chrome OS Raspberry Pi Fedora Remix Raspbian Slackware ARM QtonPi WebOS RISC OS FreeBSD NetBSD

14
Session 1: Raspberry Pi Setup
Video: Raspberry Pi Starts up….

15
系統安裝

16
所需周邊配備

17
在SD記憶卡上安裝映像檔 Windows所需軟體 下載點 Win32DiskImager(燒錄映像檔的軟體)
wheezy-raspbian.zip(作業系統映像檔) 下載點
 下載點.")
18
燒錄程序 1. 選取映像檔 2. 寫入SD

19
測試音效http://www. raspberrypi-spy. co
測試音效 音效輸出預設為自動模式,你可以底下指令指定之。 $ sudo amixer cset numid=3 n n可以是0、1、2。 0:自動 1:耳機插座 2:HDMI Test1: rpi裡有些範例程式,請以底下指令編譯: $ cd /opt/vc/src/hello_pi/ $ ./rebuild.sh $ cd hello_audio 然後,就能執行並發出"嗚嗚"聲。 ./hello_audio.bin

20
Test2: $ sudo wget $ sudo aplay police_s.wav

21
安裝中文環境

22
安裝中文字型,文泉驛微米黑、文泉驛正黑、文泉驛點陣宋體。 $ sudo apt-get install ttf-wqy-microhei ttf-wqy-zenhei xfonts-wqy

23
安裝中文輸入法 $ sudo apt-get install scim scim-tables-zh scim-chewing
其中scim-chewing是注音的輸入法,若是大陸用的拼音輸入法,請安裝scim-pinyin 重開機後,以Ctrl-Space即可切換輸入法,輸入中文。

24
能跑Android

25
Session 2: Linux 基本指令集 To update the repository database on your Rpi
$ sudo apt-get update To update all current packages with the latest version $ sudo apt-get upgrade 清除畫面 $ clear

26
桌面與遠端連線

27
遠端登入Pi 葉律佐

28
登入LXTerminal和x11 登入LXTerminal(pi的文字介面)─〉使用putty軟體的ssh
登入X11(pi的視窗介面) ─〉使用Windows的遠端 連線
 ─〉使用Windows的遠端 連線.")
29
如何知道Pi的ip(floating ip)
~ $ ifconfig

30
pi@raspberrypi ~ $ sudo raspi-config
若您想利用 SSH 來登入 Pi ,首先您必須使用 raspi-config , 將 Pi 上的 SSH server 選項設定為開啟。 ~ $ sudo raspi-config ~ $ sudo reboot

31
設定Pi的ip 在windows使用putty軟體

32
在Pi的文字介面輸入帳號(pi)和密碼(raspberry)
和密碼(raspberry)")
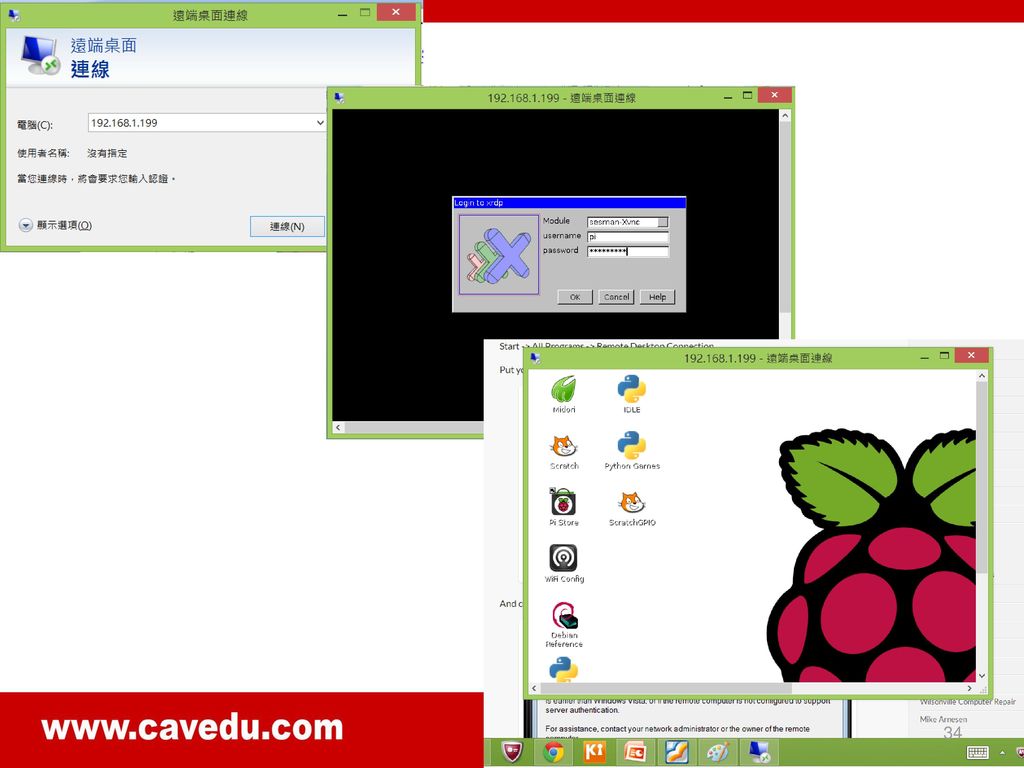
33
Remote Desktop With Raspberry Pi http://www. jeremymorgan
~ $ sudo apt-get install xrdp

35
pi@raspberrypi ~ $ sudo apt-get update
安裝Google Chrome ~ $ sudo apt-get install chromium-browser If you receive any errors running this command, try running ~ $ sudo apt-get update

36
將 Pi 當作網路伺服器

37
HTTP 伺服器:安裝與執行 Lighttpd
指令 ~ $ sudo apt-get install lighttpd 安裝結束後,Lighttpd 便會啟動,此時您可由桌上型電腦的瀏覽器輸入 Pi 的 IP位址。

38
網路伺服器的歡迎頁面

39
以下指令會將 Pi 的使用者加入 www-data 群組內,並設定/var/www 資料夾的編輯權限:
~ $ sudo adduser pi www-data ~ $ sudo chown -R www-data:www-data /var/www ~ $ sudo chmod -R 775 /var/www 等到下次登入之後,這名 Pi 使用者就能建立新的網頁了。

40
您可使用任何文字編輯器,例如先前介紹過的 nano 來編輯網頁。
以下指令會建立一個名為index.html 的檔案,這將會是您網站的起始頁面: ~ $ nano /var/www/index.html

41
接著在文字編輯器中輸入下列文字: Networking/index.html <!DOCTYPE html>
<head> <title>Hello, world!</title> </head> <body> <h1>Hello, world!</h1> </body> </html> 輸入完畢後,按下 Ctrl+X 來離開 nano。 按下 Y 確認儲存檔案,再按下 Enter確認檔案名稱。

42
此時在瀏覽器中輸入該網頁位址,所見如下:

43
建立動態內容: PHP pi@raspberrypi ~ $ sudo apt-get update
~ $ sudo apt-get install php5-cgi ~ $ sudo lighty-enable-mod fastcgi ~ $ sudo /etc/init.d/lighttpd force-reload 上述指令將安裝 PHP 解譯器與啟動 Lighttpd 伺服器中的 FastCGI 模組。

44
"bin-path" => "/usr/bin/php-cgi", "socket" => "/tmp/php.socket"
FastCGI可大幅提高動態網頁內容的處理速度,因此最好將它啟動。 為了完成安裝程序,您需要修改 Lighttpd 的組態檔案內容。 ~ $ sudo nano /etc/lighttpd/lighttpd.conf 請在檔案最後加入下方幾行指令,用來啟動 PHP 及 FastCGI。 fastcgi.server = (".php" => (( "bin-path" => "/usr/bin/php-cgi", "socket" => "/tmp/php.socket" ))) 儲存組態檔案變更完成之後,請重新啟動網路伺服器。 ~ $ sudo service lighttpd restart
)) 儲存組態檔案變更完成之後,請重新啟動網路伺服器。 ~ $ sudo service lighttpd restart.")
45
為了測試每項功能是否正確地運行,我們建立了一個名為/var/www/index.php的檔案來測試,它包含了以下內容:
~ $ nano /var/www/index.php Networking/index.php <?php phpinfo(); ?>
; >")
46
在您的網頁瀏覽器中開啟這個檔案,您將會見到如圖 18[用 Pi 傳送動態頁面資訊]所示的畫面。
![在您的網頁瀏覽器中開啟這個檔案,您將會見到如圖 18[用 Pi 傳送動態頁面資訊]所示的畫面。](http://slidesplayer.com/slide/11426565/61/images/46/%E5%9C%A8%E6%82%A8%E7%9A%84%E7%B6%B2%E9%A0%81%E7%80%8F%E8%A6%BD%E5%99%A8%E4%B8%AD%E9%96%8B%E5%95%9F%E9%80%99%E5%80%8B%E6%AA%94%E6%A1%88%EF%BC%8C%E6%82%A8%E5%B0%87%E6%9C%83%E8%A6%8B%E5%88%B0%E5%A6%82%E5%9C%96+18%5B%E7%94%A8+Pi+%E5%82%B3%E9%80%81%E5%8B%95%E6%85%8B%E9%A0%81%E9%9D%A2%E8%B3%87%E8%A8%8A%5D%E6%89%80%E7%A4%BA%E7%9A%84%E7%95%AB%E9%9D%A2%E3%80%82.jpg "在您的網頁瀏覽器中開啟這個檔案,您將會見到如圖 18[用 Pi 傳送動態頁面資訊]所示的畫面。")
47
PHP檔案從windows編輯後,上傳到Raspberry Pi
上傳到/var/www/底下的php檔案,必須將權限重設定,否則會產生403 ERR。設定指令如下:chmod 644 variables2.php

48
FTP Server Install

49
sudo apt-get install vsftpd
sudo nano /etc/vsftpd.conf uncomment the following options – local_enable=YES, write_enable=YES sudo service vsftpd restart

50
After doing a test upload using either Filezille or the ftp client of your choice, you can check the vsftpd log file to see what it thinks happened. Use tail /var/log/vsftpd.log to view the log file.

51
如何知道Pi的ip(floating ip)
~ $ ifconfig

52
Using a Static IP Address http://www. raspberrypi-tutorials. co
Enter the following command into the terminal window. $ sudo nano /etc/network/interfaces This will allow you to edit the file using nano. Change the line that reads iface eth0 inet dhcp to iface eth0 inet static Below this line enter the following. address netmask network broadcast gateway

53
利用 WiFi Config 來設定 WiFi 組態
請參考 [6.5 在 Pi 中加入 WiFi 功能]

54
Session 3: Scratch Introduction
新手入門

56
透過Wifi來控制Raspberry Pi的LED之亮滅
Project S4Pi 透過Wifi來控制Raspberry Pi的LED之亮滅

57
控制流程圖

58
接線圖

59
Scratch controlling the GPIO on a RaspberryPi
$ sudo □ wget □ □ -O □ /boot/install_scratch_gpio.sh $ sudo □ /boot/install_scratch_gpio.sh 從X11開啟ScratchGPIO->檔案/開啟舊檔/blink11,按下綠色旗子,就可以看到LED在閃滅。

60
Session 4: Python Introduction

61
啟動IDEL 3

62
在Python Shell鍵入兩行指令(1)
w=3 print (w)
")
63
在Python Shell鍵入兩行指令(2)
>>>w=20 >>>for i in range(w):print(">"+" "*(w-i)+"."*i*2+" "*(w-i)+"<") 按兩次ENTER,看看結果‧
:print( > + *(w-i)+ . *i*2+ *(w-i)+ < ) 按兩次ENTER,看看結果‧")
65
Session 5: GPIO

66
Introduction R-Pi offers lower-level interfaces intended to connect more directly with chips and subsystem modules Signals on the 2x13 header pins include SPI, I2C, serial UART, 3V3 and 5V power Not "plug and play" and require care to avoid miswiring The pins use a 3.3V logic level and are not tolerant of 5V levels, such as you might find on a 5V powered Arduino

67
Not yet software-enabled are the flex cable connectors with CSI (camera serial interface) and DSI (display serial interface), and a serial link inside the HDMI connector called CEC They provide 8 GPIO pins plus access to I²C, SPI, UART), as well as +3.3 V, +5 V and GND supply lines
, as well as +3.3 V, +5 V and GND supply lines.")
68
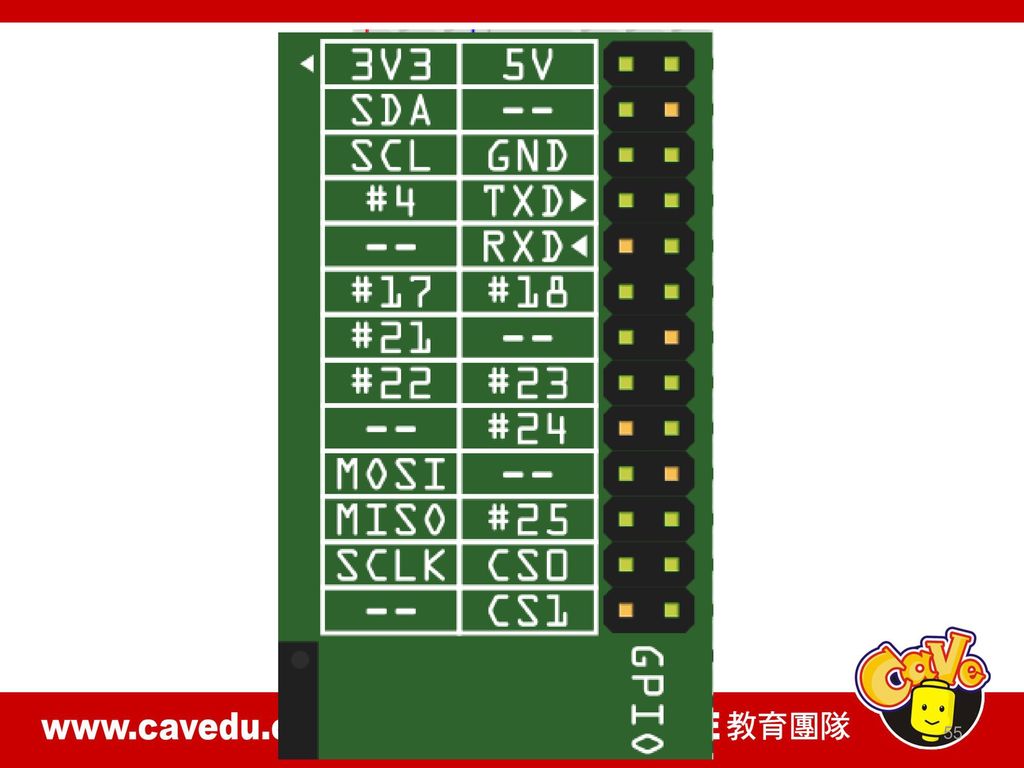
GPIO

69
RPi Serial Connection The following parameters are needed to connect to the Pi console, and apply on both Linux and Windows. Speed (baud rate): Bits: 8 Parity: None Stop Bits: 1 Flow Control: None
: Bits: 8. Parity: None. Stop Bits: 1. Flow Control: None.")
70
Connection to a microcontroller or other peripheral
The TxD and RxD signals can also be connected directly to similar signals on a microcontroller board like the Arduino provided the signals are all at 3V3 levels. It's still a good idea to put 2K2 series resistors in the lines to prevent damage when two outputs are connected together, which could also happen if a GPIO input pin is accidentally programmed as output. If your microcontroller uses 5V logic levels, level conversion is usually necessary - see 'Connecting to a PC' for details.

71
Raspberry Pi - Installing a RS232 Serial Port

72
Raspberry Pi - RS232 Serial Interface Options (Revisit)
SOFTWARE USE OF THE SERIAL PORT

73
make of backup of the two files that we intend to modify
sudo cp /boot/cmdline.txt /boot/cmdline.bak sudo cp /etc/inittab /etc/inittab.bak

74
Next $ sudo nano /boot/cmdline.txt
we need to remove the "console=ttyAMA0,115200" and "kgdboc=ttyAMA0,115200" configuration parameters from the "/boot/cmdline.txt" configuration file. To edit the file use this command: $ sudo nano /boot/cmdline.txt The file probably contains this default configuration line: dwc_otg.lpm_enable=0 console=ttyAMA0, kgdboc=ttyAMA0, console=tty1 root=/dev/mmcblk0p2 rootfstype=ext4 elevator=deadline rootwait After removing the two configuration parameters, it will look similar to this: dwc_otg.lpm_enable=0 console=tty1 root=/dev/mmcblk0p2 rootfstype=ext4 elevator=deadline rootwait

75
Last edit the "/etc/inittab" file and comment out the use of the "ttyAMA0" serial port. To edit the file use this command: $ sudo nano /etc/inittab

76
Now towards the bottom of the file, look for a configuration line that includes the "ttyAMA0" port address

77
Place a pound sign ("#") in front of the line to comment it out
Place a pound sign ("#") in front of the line to comment it out. With a pound sign ("#") at the beginning of the line, Linux will ignore this configuration line. Save the "/etc/inittab" file and then issue this command to reboot the Raspberry Pi: $ sudo reboot
 in front of the line to comment it out. With a pound sign ( # ) at the beginning of the line, Linux will ignore this configuration line. Save the /etc/inittab file and then issue this command to reboot the Raspberry Pi: $ sudo reboot.")
78
Now you are ready to use the serial port with a software application and the operating system won't interfere with the port. Use the device address "ttyAMA0" in your application to access this serial port.

79
Project:Create an internet controlled robot using Livebots

80
Serial Terminal (Communications) Software

81
GPIO Programming Python’s GPIO Scratch’s GPIO OUTPUT: LED blinking
INPUT: Switch On and Off Motor controlling Scratch’s GPIO ScratchGPIO

82
Advanced GPIO for the Raspberry Pi https://pypi.python.org/pypi/RPIO
Extends RPi.GPIO with PWM, GPIO interrups, TCP socket interrupts, command line tools and more

83
RPIO is an advanced GPIO module for the Raspberry Pi
PWM via DMA (up to 1µs resolution) GPIO input and output (drop-in replacement for RPi.GPIO) GPIO interrupts (callbacks when events occur on input gpios) TCP socket interrupts (callbacks when tcp socket clients send data) Command-line tools rpio and rpio-curses Well documented, fast source code with minimal CPU usage Open source (LGPLv3+)
 GPIO input and output (drop-in replacement for RPi.GPIO) GPIO interrupts (callbacks when events occur on input gpios) TCP socket interrupts (callbacks when tcp socket clients send data) Command-line tools rpio and rpio-curses. Well documented, fast source code with minimal CPU usage. Open source (LGPLv3+)")
84
RPIO的範例網站

85
接線圖

86
Installation $ sudo apt-get install python-setuptools
$ sudo easy_install -U RPIO

87
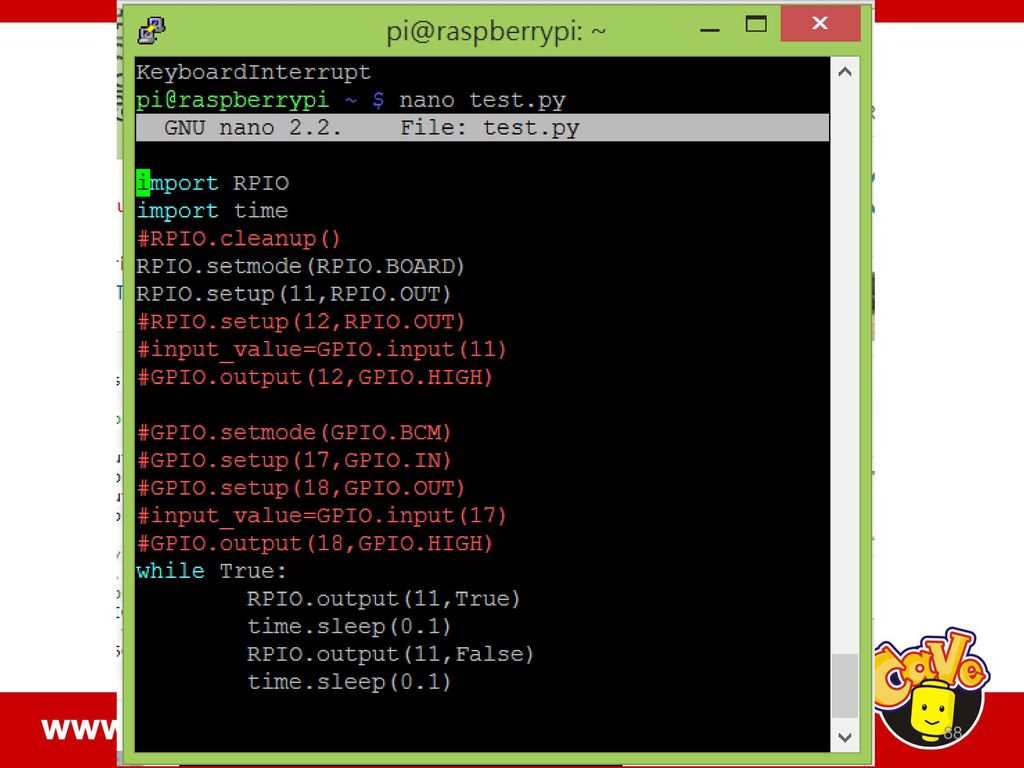
LXTerminal中,使用nano編輯程式test.py

89
下指令 $ sudo python test.py,接到pin 11的LED以每0.1秒閃爍

90
思考RPIO.cleanup()指令 釋放GPIO的channel
指令 釋放GPIO的channel")
91
How to use GPIOs on raspberry pi (Simple I/O, PWM and UART)

92
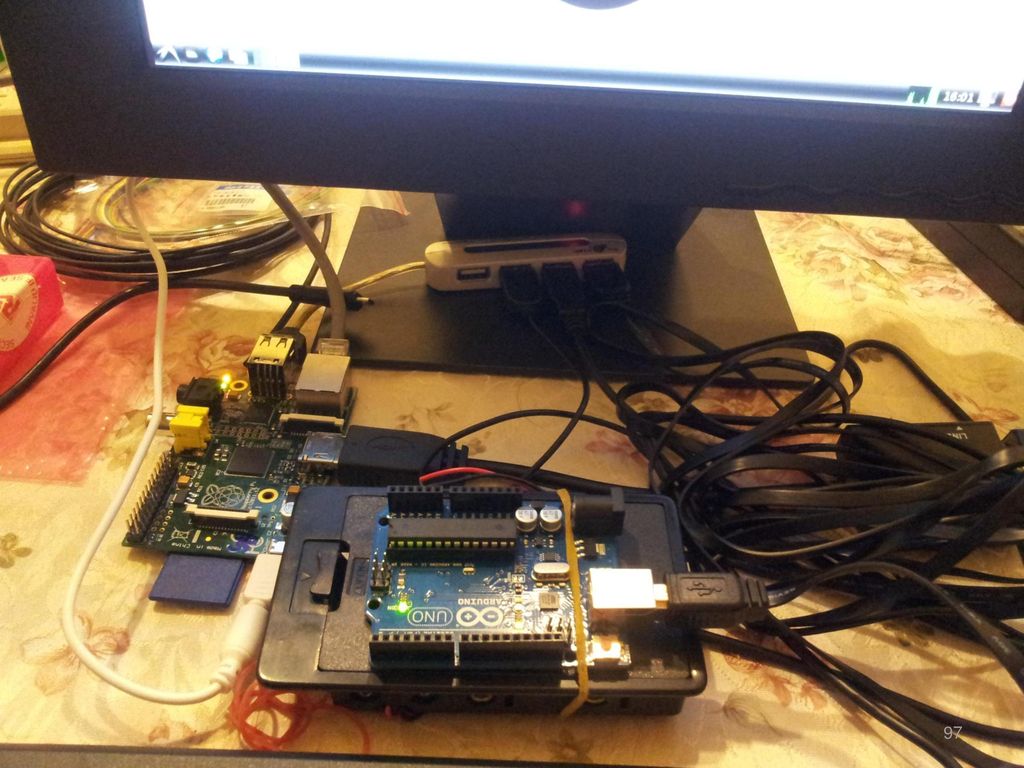
Session 6 Raspberry Pi + Arduino

93
Raspberry Pi + Arduino: Getting Started

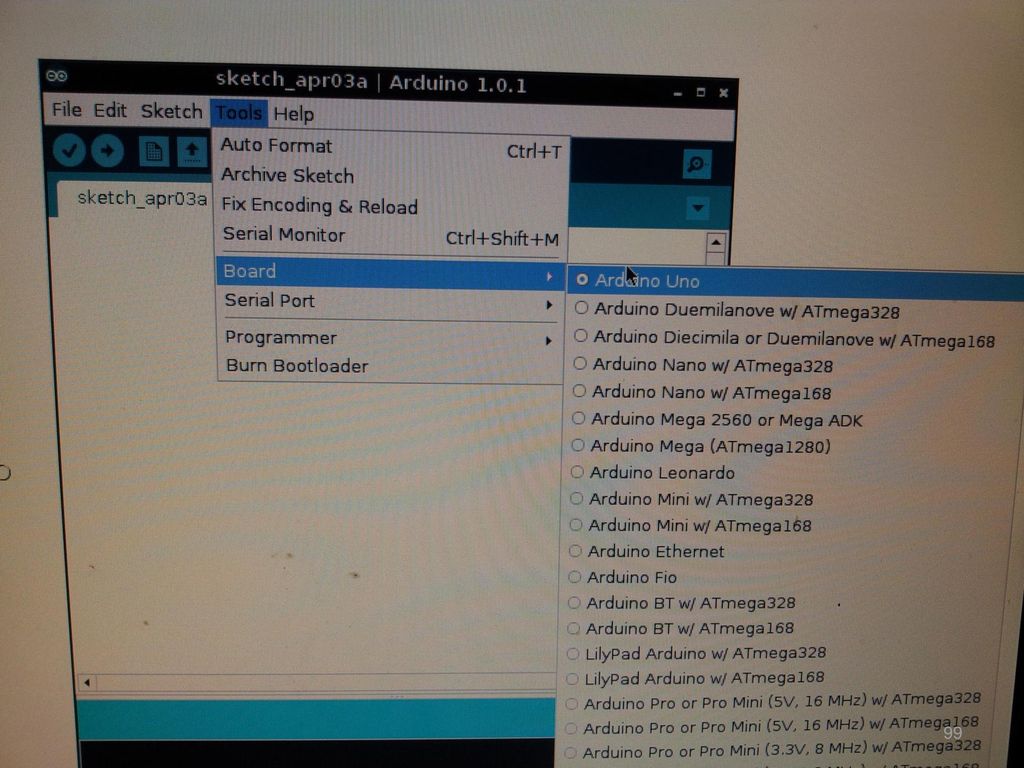
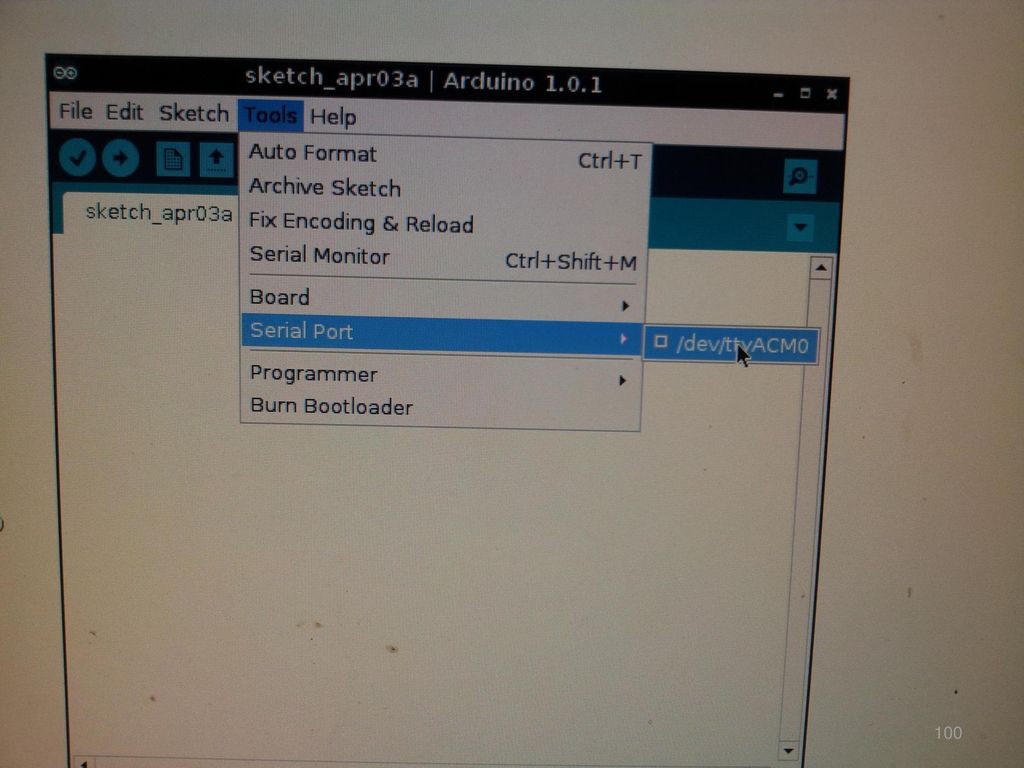
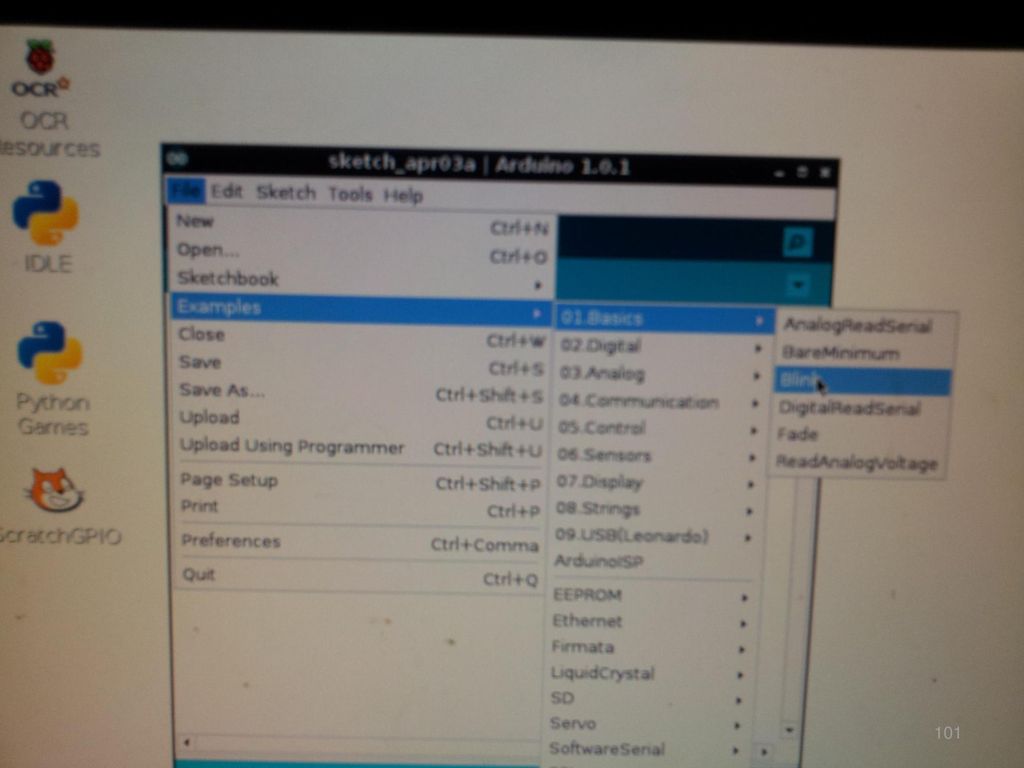
94
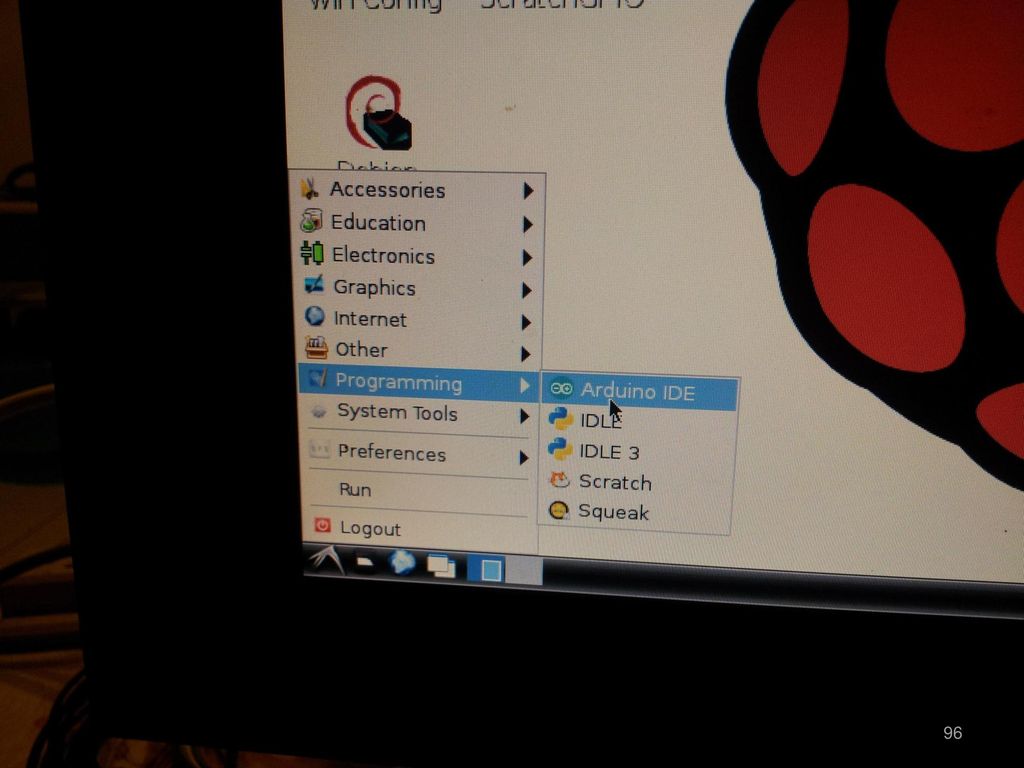
$ sudo apt-get install arduino
方法: Install Arduino To get started, install the Arduino IDE on the Raspberry Pi: $ sudo apt-get update $ sudo apt-get install arduino

104
Video

105
Web Resources http://info.scratch.mit.edu/zh-hant/Support
Similar presentations


 與 Flash 或 Processing…>")


>")

 Presented by 李明璋 R /2/21>")

