Download presentation
Presentation is loading. Please wait.

1
ANDROID PROGRAMMING1

2
OUTLINE Android程式開發 專案架構 XML Dialog Toast Menu

3
開發ANDROID的基本步驟 程式規劃&架構設計 Project包含哪些功能 需要哪些畫面&畫面間的流轉 需要之資料&其來源和格式
伺服器端支援? Database的功能? 特殊權限? 後端服務(Server)?
")
4
How to do it? 把需要之介面畫出(包含介面內包含之資訊及功能)。 釐清每個介面的轉跳關係。
釐清資料是取自網路或本機或..,資料的存取較適用 database或file。 後端服務需要長駐或只需在啟動時在後端執行,功能需要 的權限。

5
程式開發步驟 實現UI(版面配置模式&介面元件) 資料操作及儲存(資料來源&儲存方式)
實現多頁面跳轉 ex:選取選單項目來跳轉, 監聽事件發生的處理 如果跳轉暫時無法連結 → add a button Add server 完善程式細節 ex:程式需從網路取得資料 → AndroidManifest.xml 加入相關uses-permission, 舊版本更新要加入Android : version code & Android version name

6
測試&發佈程式 使用模擬器(利用模擬器&控制面板)
ex:DDMS (偵錯監視服務Dalvik Debug Monitor ServiceDalvik)是 SDK 自帶的一個可視的偵錯工具。 提供螢幕截圖、日誌存儲和行程檢測能力。 打包、產生簽暑金鑰檔案 可以發佈到Android Market
是 SDK 自帶的一個可視的偵錯工具。 提供螢幕截圖、日誌存儲和行程檢測能力。 打包、產生簽暑金鑰檔案. 可以發佈到Android Market.")
7
API查詢

8
專案架構 src/ :原始碼(source)目錄,放置.java檔 gen/ :自動生成(generate)目錄,內部檔案自動生成
R.java:資源列表,包含使用者介面、圖像、字串,程式中用到的資源都會在這裡自動產生列表。 res/ :資源(resouce)目錄,存放資料檔案、圖片、xml檔 layout/ :xml介面描述檔 values/ :xml格式的參數值描述檔 drawable/ :用到的圖片 AndroidManifest.xml :應用程式功能清單
目錄,存放資料檔案、圖片、xml檔. layout/ :xml介面描述檔. values/ :xml格式的參數值描述檔. drawable/ :用到的圖片. AndroidManifest.xml :應用程式功能清單.")
9
XML 描述使用者介面 res/layout/main.xml 將介面顯示與程式邏輯分離 ex. 哪裡顯示文字,哪裡顯示按鈕
程式的由此檔案描述

10
XML檔 XML (Extensible Markup Language) 是一種標記描述語言,不管是語法還是看起來的樣子,都相當類似網頁所使用的 HTML 標記語言。 XML 被廣泛地運用在 Java 程式的設定中。「main.xml」 文件裡,第一行是每個 XML 描述檔固定的開頭內容,用來指示這個文字檔案是以 XML格式描述的。

11
res/layout/main.xml <?xml version="1.0" encoding="utf-8"?>
<LinearLayout xmlns:android=" android:orientation="vertical" android:layout_width="fill_parent" android:layout_height="fill_parent" > <TextView android:layout_width="fill_parent" android:layout_height="wrap_content" android:text="@string/hello" /> </LinearLayout>

12
res/layout/main.xml <?xml version="1.0" encoding="utf-8"?>
LinearLayout (線性版面配置) res/layout/main.xml <?xml version="1.0" encoding="utf-8"?> <LinearLayout xmlns:android=" android:orientation="vertical" android:layout_width="fill_parent" android:layout_height="fill_parent" > <TextView android:layout_width="fill_parent" android:layout_height="wrap_content" android:text="@string/hello" /> </LinearLayout> FrameLayout (框架版面配置) TableLayout (表格版面配置) AbsoluteLayout (絕對位置版面配置) RelativeLayout (相對位置版面配置) "線性版面配置" 所指的是包含在 「LinearLayout」 標籤中,所有元件的配置方式,是將一個接一個元件由上而下排隊排下來的意思。
 res/layout/main.xml. < xml version= 1.0 encoding= utf-8 > <LinearLayout xmlns:android= android:orientation= vertical android:layout_width= fill_parent android:layout_height= fill_parent > <TextView android:layout_width= fill_parent android:layout_height= wrap_content android:text= @string/hello /> </LinearLayout> FrameLayout. (框架版面配置) TableLayout. (表格版面配置) AbsoluteLayout. (絕對位置版面配置) RelativeLayout. (相對位置版面配置) 線性版面配置 所指的是包含在 「LinearLayout」 標籤中,所有元件的配置方式,是將一個接一個元件由上而下排隊排下來的意思。")
13
res/layout/main.xml <?xml version="1.0" encoding="utf-8"?>
<LinearLayout xmlns:android=" android:orientation="vertical" android:layout_width="fill_parent" android:layout_height="fill_parent" > <TextView android:layout_width="fill_parent" android:layout_height="wrap_content" android:text="@string/hello" /> </LinearLayout> 走向 介面寬度 介面長度 同一個介面元件的屬性之間,是以空白做區隔,因此事實上你也能將多個屬性寫在同一行。當然,將屬性排成多行更易於閱讀。

14
res/layout/main.xml <?xml version="1.0" encoding="utf-8"?>
<LinearLayout xmlns:android=" android:orientation="vertical" android:layout_width="fill_parent" android:layout_height="fill_parent" > <TextView android:layout_width="fill_parent" android:layout_height="wrap_content" android:text=" Hello World, Bmi!” /> </LinearLayout> 是顯示文字到螢幕上 TextView (文字檢視) 其作用是顯示文字到螢幕上。 「wrap_content」(包住內容),亦即隨著文字欄位行數的不同而改變這個介面元件的高度
 其作用是顯示文字到螢幕上。 「wrap_content」(包住內容),亦即隨著文字欄位行數的不同而改變這個介面元件的高度.")
15
VIEW 顯示介面類 ex. 文字、按鈕、輸入欄位 版面配置類 ex. Layout、Tab 狀態提示類 ex. 進度條、等待圈

16
BMI程式 BMI值=體重(kg) / 身高(m)^2
 / 身高(m)^2")
17
MAIN.XML <TextView android:layout_width="fill_parent“ android:layout_height="wrap_content“ android:text="身高 (cm)“ /> <EditText android:layout_width="fill_parent“ android:layout_height="wrap_content“ android:numeric="integer" android:text="" 將 「android:numeric」 指定為 「integer」,可以限制使用者只能在 EditText 文字欄位中輸入整數數字。 「android:phoneNumber=“true”」(僅允許輸入電話號碼) 「android:autoLink=“all”」(自動將文字轉成超連結) 「android:numeric=“true”」 限制使用者只能輸入數字 「android:phoneNumber=“true”」 僅允許輸入電話號碼 「android:autoLink=“all”」 自動將文字轉成超連結 「android:numeric=“true”」 限制使用者只能輸入數字
 /> <EditText android:layout_width= fill_parent android:layout_height= wrap_content android:numeric= integer android:text= 將 「android:numeric」 指定為 「integer」,可以限制使用者只能在 EditText 文字欄位中輸入整數數字。 「android:phoneNumber= true 」(僅允許輸入電話號碼) 「android:autoLink= all 」(自動將文字轉成超連結) 「android:numeric= true 」 限制使用者只能輸入數字. 「android:phoneNumber= true 」 僅允許輸入電話號碼. 「android:autoLink= all 」 自動將文字轉成超連結. 「android:numeric= true 」 限制使用者只能輸入數字.")
18
MAIN.XML <TextView android:layout_width="fill_parent" android:layout_height="wrap_content" android:text="體重 (kg)" /> <EditText android:layout_width="fill_parent" android:layout_height="wrap_content" android:numeric="integer" android:text="" />
 /> <EditText android:layout_width= fill_parent android:layout_height= wrap_content android:numeric= integer android:text= />")
19
MAIN.XML <Button android:layout_width="fill_parent" android:layout_height="wrap_content" android:text="計算 BMI 值" /> <TextView android:layout_width="fill_parent" android:layout_height="wrap_content" android:text="" /> <TextView android:layout_width="fill_parent" android:layout_height="wrap_content" android:text=""

20
將字串抽離 XML res/values/strings.xml
<?xml version="1.0" encoding="utf-8"?> <resources> <string name="app_name">BMI</string> <string name="bmi_height">身高 (cm)</string> <string name="bmi_weight">體重 (kg)</string> <string name="bmi_btn">計算 BMI 值</string> <string name="bmi_result">你的 BMI 值是 </string> </resources> 在values資料夾內建立strings.xml <string name="識別代號">文字敘述</string>
</string> <string name= bmi_weight >體重 (kg)</string> <string name= bmi_btn >計算 BMI 值</string> <string name= bmi_result >你的 BMI 值是 </string> </resources> 在values資料夾內建立strings.xml. <string name= 識別代號 >文字敘述</string>")
21
存取識別符號 @[類型]/[識別符號] <EditText android:id="@+id/height” /> XML占空間
Android 並不直接使用 XML 檔案,而是透過 Android 開 發工具,自動將 XML 描述檔轉換成資源檔案。一旦應用 程式要操作某個介面元件,或是使用任何種類的資源(字串、 圖片、圖示、音效...),都使用索引來查詢。 以後的程式中會使用「R.id.height」來取得這個介面元件。「@+id」 的意思是我們可以通過這個識別符號來控制所對應的介面元件,「R」類別會自動配置一個位址給這個介面元件。 「R」類別的內容則可以透過查看 R.java 得知。
,都使用索引來查詢。 以後的程式中會使用「R.id.height」來取得這個介面元件。「@+id」 的意思是我們可以通過這個識別符號來控制所對應的介面元件,「R」類別會自動配置一個位址給這個介面元件。 「R」類別的內容則可以透過查看 R.java 得知。")
22
R.java public final class R { public static final class attr { } public static final class drawable { public static final int icon=0x7f020000; } public static final class id { public static final int height=0x7f050000; public static final int result=0x7f050003; public static final int submit=0x7f050002; public static final int suggest=0x7f050004; public static final int weight=0x7f050001; } public static final class layout { public static final int main=0x7f030000; } public static final class string { public static final int app_name=0x7f040000; } } 屬性 圖片 識別符號 介面描述 文字

23
<string name="bmi_height">身高 (cm)</string>
BEFORE <TextView android:layout_width=“fill_parent“ android:layout_height=”wrap_content“ android:text=”身高 (cm)“ /> <string name="bmi_height">身高 (cm)</string> AFTER <TextView android:layout_width="fill_parent" android:layout_height="wrap_content" />
 /> <string name= bmi_height >身高 (cm)</string> AFTER. <TextView android:layout_width= fill_parent android:layout_height= wrap_content />")
24
.JAVA 專案開啟時已經寫好了 Eclipse+Android 開發工具已經幫我們預先建立好了基本的程式邏輯。

25
package test. BMI; import android. app. Activity; import android. os
package test.BMI; import android.app.Activity; import android.os.Bundle; public class BMI extends Activity { /** Called when the activity is first created. public void onCreate(Bundle savedInstanceState) { super.onCreate(savedInstanceState); setContentView(R.layout.main); } 程式中預設導入了 「android.app.Activity」跟「android.os.Bundle」兩個 Package,在所有的 Android 應用程式中都會用到這兩個 Package。「import」(導入)是用作導入 Package 的關鍵字。在 Java 語言中,使用到任何 API 前都要事先導入相對應的 Package。我們馬上將學到這兩個 Package 的用途。
 { super.onCreate(savedInstanceState); setContentView(R.layout.main); } 程式中預設導入了 「android.app.Activity」跟「android.os.Bundle」兩個 Package,在所有的 Android 應用程式中都會用到這兩個 Package。「import」(導入)是用作導入 Package 的關鍵字。在 Java 語言中,使用到任何 API 前都要事先導入相對應的 Package。我們馬上將學到這兩個 Package 的用途。")
26
package test. BMI; import android. app. Activity; import android. os
package test.BMI; import android.app.Activity; import android.os.Bundle; public class BMI extends Activity { /** Called when the activity is first created. public void onCreate(Bundle savedInstanceState) { super.onCreate(savedInstanceState); setContentView(R.layout.main); } 「public class Bmi」後面再加上「extends Activity」敘述,則表示 「Bmi」 這個類別的功能、型別等全繼承自「Activity」類別。「extends」是繼承(Inherit)類別的關鍵字。「Activity」是來自於我們在第3行剛導入的Package。
 { super.onCreate(savedInstanceState); setContentView(R.layout.main); } 「public class Bmi」後面再加上「extends Activity」敘述,則表示 「Bmi」 這個類別的功能、型別等全繼承自「Activity」類別。「extends」是繼承(Inherit)類別的關鍵字。「Activity」是來自於我們在第3行剛導入的Package。")
27
package test. BMI; import android. app. Activity; import android. os
package test.BMI; import android.app.Activity; import android.os.Bundle; public class BMI extends Activity { /** Called when the activity is first created. public void onCreate(Bundle savedInstanceState) { super.onCreate(savedInstanceState); setContentView(R.layout.main); } 與記憶體管理有關
 { super.onCreate(savedInstanceState); setContentView(R.layout.main); } 與記憶體管理有關.")
28
package test. BMI; import android. app. Activity; import android. os
package test.BMI; import android.app.Activity; import android.os.Bundle; public class BMI extends Activity { /** Called when the activity is first created. public void onCreate(Bundle savedInstanceState) { super.onCreate(savedInstanceState); setContentView(R.layout.main); } Google Android 將其應用程式的介面稱為視圖(View),而負責控制各種動作行為的程式主體(Controller),則稱為活動(Activity)。因此一個 Android 應用程式,必定會對應到一個以上的 Activity。 「onCreate」 方法則是每個 Activity 類別初始化時都會去呼叫的方法。我們想做的事,是保持原本「onCreate」 方法預設的動作,然後在其中加入我們想要的內容。 而 Android 類別的「onCreate」 方法。原本繼承自 「Activity」類別的「onCreate」方法,其原本內容都被覆載掉了。因此想將原本的「onCreate」方法內容保留,並在其中加入我們的內容的話,就要使用「super」語句。當程式運行到我們覆寫的「onCreate」 方法時,透過「super.onCreate(savedInstanceState);」語句,會先將原本「Activity」類別中的「onCreate」方法執行一次,然後再執行我們覆寫的「onCreate」方法裡面其他的程式內容。 我們要執行原本的「onCreate」 方法時,仍然需要提供原本「onCreate」方法所需的傳入參數。因此「super.onCreate(savedInstanceState);」語句中,我們將「savedInstanceState」這個參數傳入原本的「onCreate」函式中。「savedInstanceState」是我們在「public void onCreate(Bundle savedInstanceState)」語句中所宣告的傳入參數。
 { super.onCreate(savedInstanceState); setContentView(R.layout.main); } Google Android 將其應用程式的介面稱為視圖(View),而負責控制各種動作行為的程式主體(Controller),則稱為活動(Activity)。因此一個 Android 應用程式,必定會對應到一個以上的 Activity。 「onCreate」 方法則是每個 Activity 類別初始化時都會去呼叫的方法。我們想做的事,是保持原本「onCreate」 方法預設的動作,然後在其中加入我們想要的內容。 而 Android 類別的「onCreate」 方法。原本繼承自 「Activity」類別的「onCreate」方法,其原本內容都被覆載掉了。因此想將原本的「onCreate」方法內容保留,並在其中加入我們的內容的話,就要使用「super」語句。當程式運行到我們覆寫的「onCreate」 方法時,透過「super.onCreate(savedInstanceState);」語句,會先將原本「Activity」類別中的「onCreate」方法執行一次,然後再執行我們覆寫的「onCreate」方法裡面其他的程式內容。 我們要執行原本的「onCreate」 方法時,仍然需要提供原本「onCreate」方法所需的傳入參數。因此「super.onCreate(savedInstanceState);」語句中,我們將「savedInstanceState」這個參數傳入原本的「onCreate」函式中。「savedInstanceState」是我們在「public void onCreate(Bundle savedInstanceState)」語句中所宣告的傳入參數。")
29
package test. BMI; import android. app. Activity; import android. os
package test.BMI; import android.app.Activity; import android.os.Bundle; public class BMI extends Activity { /** Called when the activity is first created. public void onCreate(Bundle savedInstanceState) { super.onCreate(savedInstanceState); setContentView(R.layout.main); } 透過螢幕顯示的各種元素是按照介面層次結構來描述的。要將一個顯示元素的層次結構轉換顯示到一個螢幕上,Activity 會呼叫它用來設定 View 的 「setContentView」 方法,並傳入想引用的 XML 描述文件。當 Activity 被啟動並需要顯示到螢幕上時,系統會通知 Activity,並根據引用的 XML 文件敘述來描繪出使用者介面。我們定義好的 res/layout/main.xml 描述檔,就是透過這個機制繪出到螢幕上。 setContentView 方法也可以在 Activity 類別中找到。
 { super.onCreate(savedInstanceState); setContentView(R.layout.main); } 透過螢幕顯示的各種元素是按照介面層次結構來描述的。要將一個顯示元素的層次結構轉換顯示到一個螢幕上,Activity 會呼叫它用來設定 View 的 「setContentView」 方法,並傳入想引用的 XML 描述文件。當 Activity 被啟動並需要顯示到螢幕上時,系統會通知 Activity,並根據引用的 XML 文件敘述來描繪出使用者介面。我們定義好的 res/layout/main.xml 描述檔,就是透過這個機制繪出到螢幕上。 setContentView 方法也可以在 Activity 類別中找到。")
30
BMI.JAVA Button button = (Button)findViewById(R.id.submit);
findViewById(R.id.submit);")
31
BMI.JAVA button.setOnClickListener(calcBMI);
方法中傳入了一個「calcBMI」函式。Android 系統的 UI 互動方式採用常見的事件驅動方式。也就是當使用者按下「button」按鈕的時候,Android 系統會去觸發按鈕的「setOnClickListener」方法中所指定的「calcBMI」函式。

32
觸發事件函式 當使用者按下按鈕時,即觸發「OnClickListener」類型的事件函式。也有人將這種函式稱為回呼(Call Back)函式,因為是當有動作做完(使用者按下了按鈕),才會呼叫(算出 BMI 值)。 onClick(View v) 是 OnClickListener 中實作的方法,代表按下按鈕時會執行的事件方法。
 是 OnClickListener 中實作的方法,代表按下按鈕時會執行的事件方法。")
33
編輯欄位 與上面 button 的宣告類似,只是改成宣告 EditText 實體,透過 findViewById 方法,從資源檔中取得對應的文字欄位元件。這邊取出的是「R.id.height」和「R.id.weight」文字欄位元件。

34
運算

35
顯示結果 為了將結果顯示到螢幕上,在之前 XML 定義檔中我們已經預留了一個名為「result」的 TextView 欄位。在程式碼中,我們再宣告一個 TextView 實體,透過 findViewById 方法,從資源檔中取得對應的介面元件(文字顯示)。這邊取出的就是「R.id.result」介面元件。
。這邊取出的就是「R.id.result」介面元件。")
36
格式 透過 java 內建的 DecimalFormat 函式,我們可以將運算結果,以適當的格式顯示。
透過「setText」方法,我們可以將指定的字串,顯示在螢幕上文字類型的介面元件中。

37
顯示建議

38
DIALOG

40
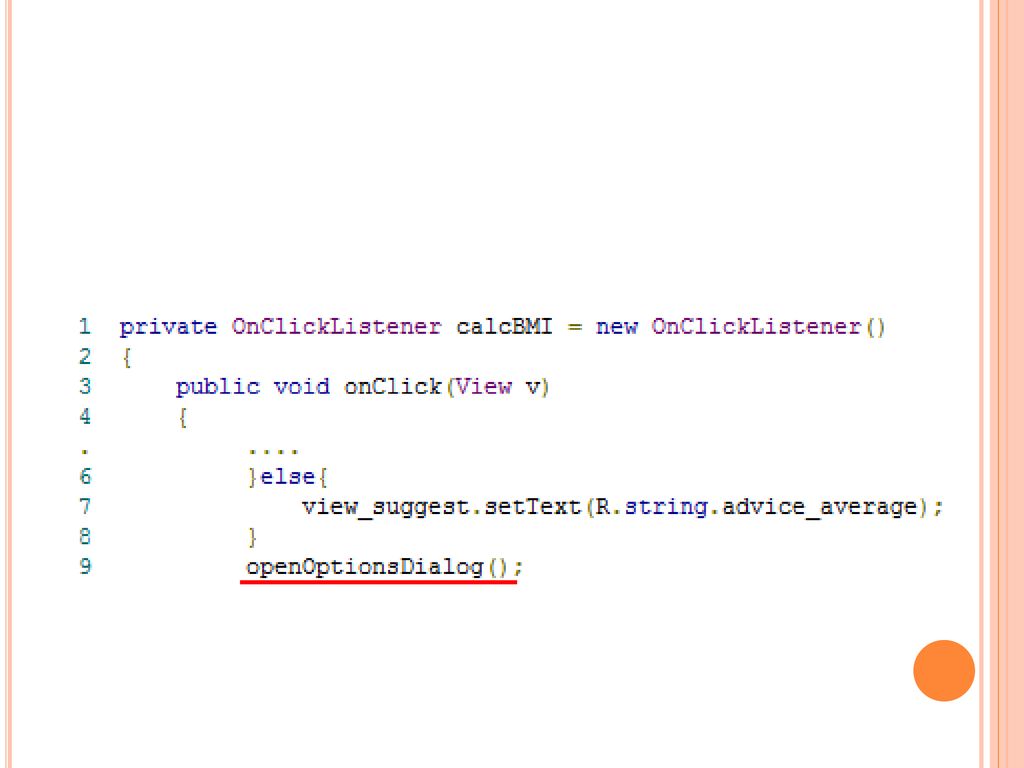
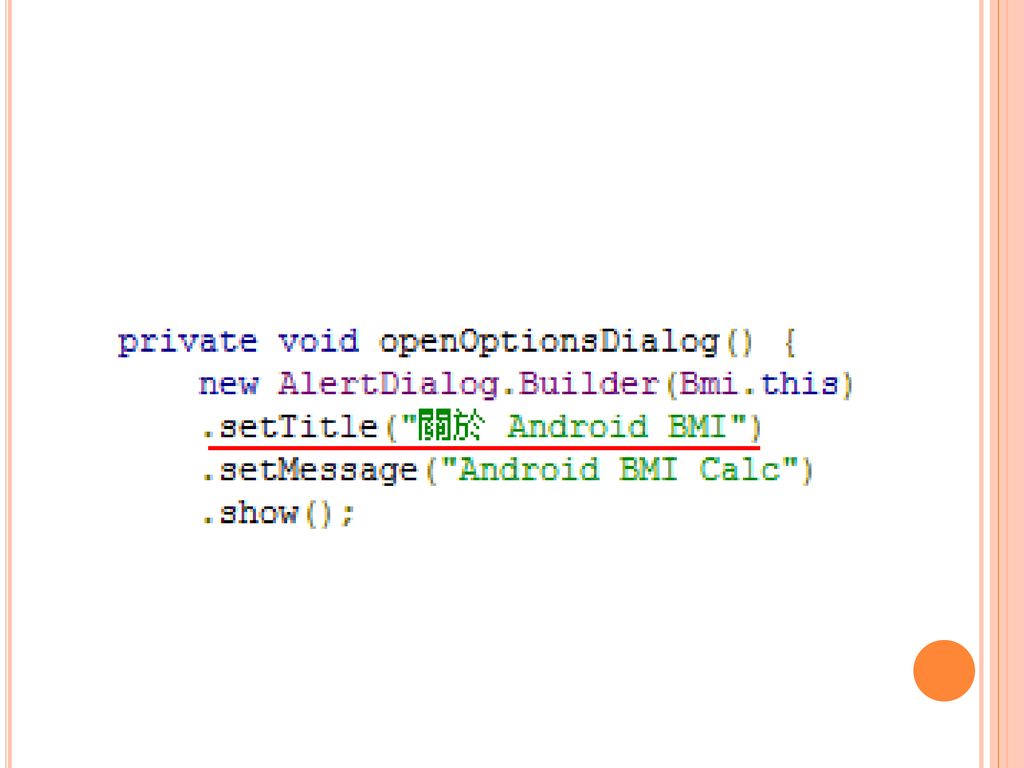
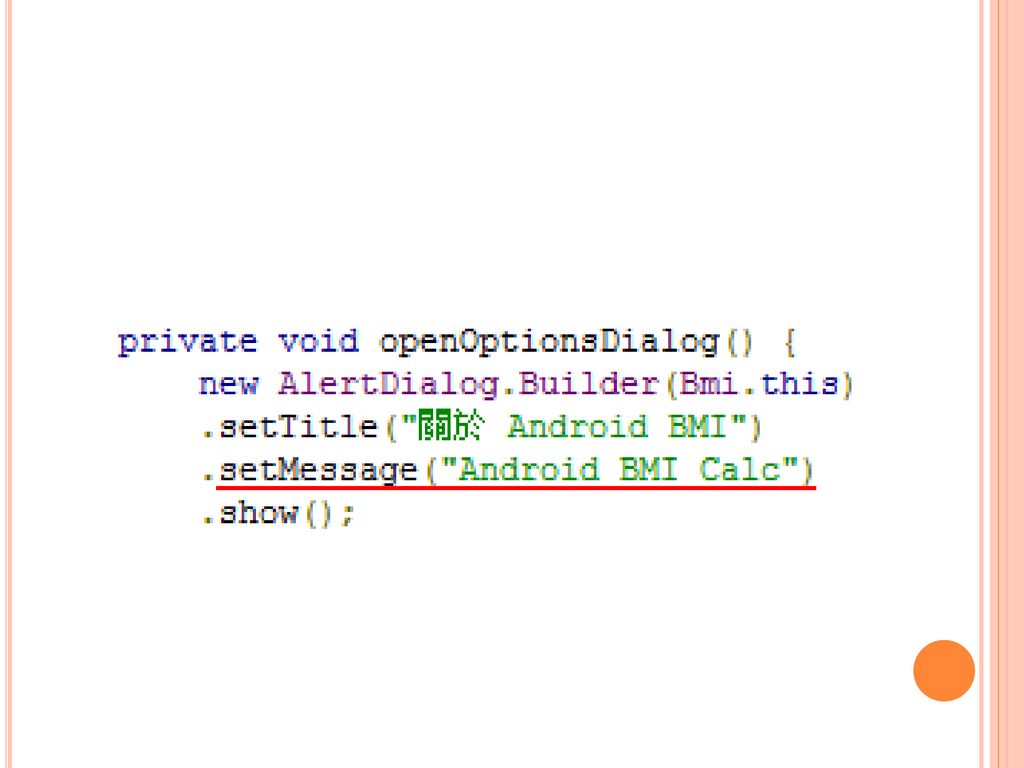
OPENOPTIONSDIALOG()函式內容
建立了一個 AlertDialog 對話框類別實體

43
最後一定要顯示

44
DIALOG加入按鈕 沒做事結束對話框

46
TOAST

47
顯示時間長短

48
MENU

49
建立選單 處理選項動作

50
建立選單

51
建立menu選單裡的兩個按鈕

52
處理選項動作

53
看哪一個被選到就做什麼事

54
小技巧 Ctrl+Shift+o 自動import需要的東西

Similar presentations