Download presentation
Presentation is loading. Please wait.

1
內容:I2C通訊(wire函數) 實作:Arduino <->Arduino by I2C 簡報:廖崇義
Arduino week8 內容:I2C通訊(wire函數) 實作:Arduino <->Arduino by I2C 簡報:廖崇義
 實作:Arduino <->Arduino by I2C. 簡報:廖崇義.")
2
I2C通訊介紹 I²C(Inter-Integrated Circuit)是內部整合電路的稱呼 ,是一種串列通訊匯流排,使用多主從架構,由飛利浦公 司在1980年代為了讓主機板、嵌入式系統或手機用以連 接低速週邊裝置而發展。I²C的正確讀法為"I-squared-C“ 使用I²C協定不需要為其專利付費,但製造商仍然需要付 費以獲得I²C從屬裝置位址(IP Adress)。 I²C只使用兩條雙向開放集極(Open Drain)(串列資料 (SDA)及串列時脈(SCL))並利用電阻將電位上拉。 I²C允許相當大的工作電壓範圍,但典型的電壓準位為 +3.3V或+5v。
。 I²C只使用兩條雙向開放集極(Open Drain)(串列資料 (SDA)及串列時脈(SCL))並利用電阻將電位上拉。 I²C允許相當大的工作電壓範圍,但典型的電壓準位為 +3.3V或+5v。")
3
I²C的參考設計使用一個7位元長度的位址空間但保留了16 個位址,所以在一組匯流排最多可和112個節點通訊。
常見的I²C匯流排依傳輸速率的不同而有不同的模式:標 準模式(100 Kbit/s)、低速模式(10 Kbit/s),但時脈 頻率可被允許下降至零,這代表可以暫停通訊。 而新一代的I²C匯流排可以和更多的節點(支援10位元長 度的位址空間)以更快的速率通訊:快速模式(400 Kbit/s)、高速模式(3.4 Mbit/s)。 雖然最大的節點數目是被位址空間所限制住,但實際上也 會被匯流排上的總電容所限制住,一般而言為400 pF。
、低速模式(10 Kbit/s),但時脈 頻率可被允許下降至零,這代表可以暫停通訊。 而新一代的I²C匯流排可以和更多的節點(支援10位元長 度的位址空間)以更快的速率通訊:快速模式(400 Kbit/s)、高速模式(3.4 Mbit/s)。 雖然最大的節點數目是被位址空間所限制住,但實際上也 會被匯流排上的總電容所限制住,一般而言為400 pF。")
4
應用 數位周邊IC、感測IC(溫濕度計、加速度計、陀螺儀等) 存取低速的數位類比轉換器(DAC)。 存取低速的類比數位轉換器(ADC)。
取得硬體監視及診斷資料,例如CPU的溫度及風扇轉速。 讀取實時時鐘(Real-time clock)。 在系統設備中用來開啟或關閉電源供應。 最常被使用在於微控制器的應用,利用兩根通用的輸入輸出 接腳及軟體的規劃,可以讓微控制器控制一個小型網路。 週邊可以在系統仍然在運作的同時加入或移出匯流排,這代 表對於有熱插拔需求的裝置而言是個理想的匯流排。 像I²C這樣的匯流排之所以流行起來,是因為電腦工程師發現 到對於整合電路設計而言,許多的製造成本源自於封裝尺寸 及接腳數量。
。 在系統設備中用來開啟或關閉電源供應。 最常被使用在於微控制器的應用,利用兩根通用的輸入輸出 接腳及軟體的規劃,可以讓微控制器控制一個小型網路。 週邊可以在系統仍然在運作的同時加入或移出匯流排,這代 表對於有熱插拔需求的裝置而言是個理想的匯流排。 像I²C這樣的匯流排之所以流行起來,是因為電腦工程師發現 到對於整合電路設計而言,許多的製造成本源自於封裝尺寸 及接腳數量。")
5
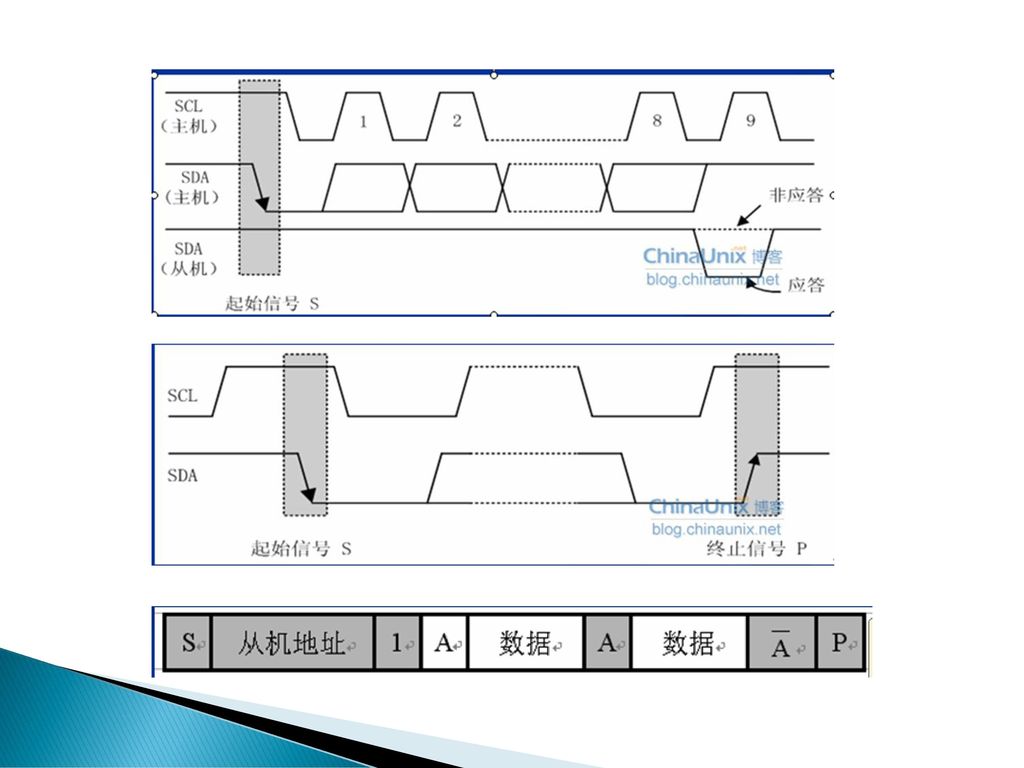
I2C動作原理

7
Arduino Wire This library allows you to communicate with I2C / TWI devices. On the Arduino boards with the R3 layout (1.0 pinout), the SDA (data line) and SCL (clock line) are on the pin headers close to the AREF pin. The Arduino Due has two I2C / TWI interfaces SDA1 and SCL1 are near to the AREF pin and the additional one is on pins 20 and 21. As a reference the table below shows where TWI pins are located on various Arduino boards. Board I2C / TWI pins Uno, Ethernet A4 (SDA), A5 (SCL) Mega2560 20 (SDA), 21 (SCL) Leonardo 2 (SDA), 3 (SCL) Due 20 (SDA), 21 (SCL), SDA1, SCL1
, the SDA (data line) and SCL (clock line) are on the pin headers close to the AREF pin. The Arduino Due has two I2C / TWI interfaces SDA1 and SCL1 are near to the AREF pin and the additional one is on pins 20 and 21. As a reference the table below shows where TWI pins are located on various Arduino boards. Board. I2C / TWI pins. Uno, Ethernet. A4 (SDA), A5 (SCL) Mega (SDA), 21 (SCL) Leonardo. 2 (SDA), 3 (SCL) Due. 20 (SDA), 21 (SCL), SDA1, SCL1.")
8
Wire Library Functions begin() requestFrom() beginTransmission()
endTransmission() write() available() read() onReceive() onRequest()
 write() available() read() onReceive() onRequest()")
9
begin() 說明 參數 Wire.begin() Wire.begin(address)
Initiate the Wire library and join the I2C bus as a master or slave. This should normally be called only once. 參數 address: the 7-bit slave address (optional); if not specified, join the bus as a master.
; if not specified, join the bus as a master.")
10
beginTransmission() Wire.beginTransmission(address) 說明 參數
Begin a transmission to the I2C slave device with the given address. Subsequently, queue bytes for transmission with the write() function and transmit them by calling endTransmission(). 參數 address: the 7-bit address of the device to transmit to
 function and transmit them by calling endTransmission(). 參數. address: the 7-bit address of the device to transmit to.")
11
write() Wire.write(value) 說明 參數
slave 裝置回覆 master 裝置的請求。或是從 master 裝置 向slave 裝 置請求的資料傳送(in-between calls to beginTransmission() and endTransmission()). 參數 value: a value to send as a single byte string: a string to send as a series of bytes data: an array of data to send as bytes length: the number of bytes to transmit
 and endTransmission()). 參數. value: a value to send as a single byte. string: a string to send as a series of bytes. data: an array of data to send as bytes. length: the number of bytes to transmit.")
12
write() Example #include <Wire.h> byte val = 0; void setup() { Wire.begin(); // join i2c bus } void loop() { Wire.beginTransmission(44); // transmit to device #44 (0x2c) // device address is specified in datasheet Wire.write(val); // sends value byte Wire.endTransmission(); // stop transmitting val++; // increment value if(val == 64) // if reached 64th position (max) { val = 0; // start over from lowest value } delay(500); }
 { Wire.begin(); // join i2c bus } void loop() { Wire.beginTransmission(44); // transmit to device #44 (0x2c) // device address is specified in datasheet Wire.write(val); // sends value byte Wire.endTransmission(); // stop transmitting val++; // increment value if(val == 64) // if reached 64th position (max) { val = 0; // start over from lowest value } delay(500); }")
13
requestFrom() Wire.requestFrom(address, quantity, stop) 說明 參數
用來讓 master裝置向 sleave 裝置請求 byte 資料 請求的 byte 資料可以用 available() 和 read() 這兩個函數取得 參數 address: 要請求資料之設備端的 7位元位址 quantity: 請求資料的數量 stop: boolean型態. true 將在請求之後送出停止訊息, 釋放匯流排.false 將在 請求之後送出重新開始, 持續保持連結 這樣防止其他的 master 裝置在兩個訊息之間發送請求 這種做法讓 1個 master 裝置, 當控制時送出多個請求。
 和 read() 這兩個函數取得. 參數. address: 要請求資料之設備端的 7位元位址. quantity: 請求資料的數量. stop: boolean型態. true 將在請求之後送出停止訊息, 釋放匯流排.false 將在 請求之後送出重新開始, 持續保持連結. 這樣防止其他的 master 裝置在兩個訊息之間發送請求. 這種做法讓 1個 master 裝置, 當控制時送出多個請求。")
14
available() Wire.available() 說明 Returns Returns可讓 read () 接收的資料數量
這個函數應該在 master 裝置呼叫完 requestFrom() 之後呼叫,或是在 slave 的 onReceive() handler 函數內呼叫 Returns 可以讀取的資料數量
 之後呼叫,或是在 slave 的 onReceive() handler 函數內呼叫. Returns. 可以讀取的資料數量.")
15
read() Wire.read() 說明 讀取一個從 salve 裝置傳送到 master 的位元組(在master 呼叫 requestFrom() 之後), 或是master 傳送到 slave 的位元組資料. Example #include <Wire.h> void setup(){ Wire.begin(); //加入到 I2C 匯流排 (未加位址代表是 master ) Serial.begin(9600); //啟動串列埠, 輸出訊息到電腦上 } void loop(){ Wire.requestFrom(2, 6); //從裝置 2 , 請求6個位元組 while(Wire.available()) //slave 送出的也許少於 master 請求的 { char c = Wire.read(); // 用 character 型態接收 位元組資料 Serial.print(c); // 輸出接收到的資料 delay(500);
{ Wire.begin(); //加入到 I2C 匯流排 (未加位址代表是 master ) Serial.begin(9600); //啟動串列埠, 輸出訊息到電腦上. } void loop(){ Wire.requestFrom(2, 6); //從裝置 2 , 請求6個位元組. while(Wire.available()) //slave 送出的也許少於 master 請求的. { char c = Wire.read(); // 用 character 型態接收 位元組資料. Serial.print(c); // 輸出接收到的資料. delay(500);")
16
onReceive() Wire.onReceive(handler) 說明 參數
註冊一個自定義函數, 當 slave 裝置收到來自 master 的訊息時呼叫這 個自定義函數 參數 handler: 當接收到資料時會被呼叫的自定義函數; 這個函數必須帶一個 int 的參數 (被傳入來自master 資料的位元組數 )而且沒有返回值 例如: void myHandler(int numBytes)
而且沒有返回值 例如: void myHandler(int numBytes)")
17
onRequest() Wire.onRequest(handler) 說明 參數
註冊處理當接收到來自Master Arduino requestFrom(address,count)要求回應資料時會觸發的處理程序 (handler)。 參數 handler: 當接收到資料時會被呼叫的自定義函數; 沒有參數, 也沒有返回值 例如:void myHandler()
要求回應資料時會觸發的處理程序 (handler)。 參數. handler: 當接收到資料時會被呼叫的自定義函數; 沒有參數, 也沒有返回值. 例如:void myHandler()")
18
練習一多台 Arduino 間的通訊1 1.電路圖

19
2.程式碼(Master) // master_sender.ino // Refer to the "slave_receiver" example for use with this #include <Wire.h> const int SLAVE_ADDRESS = 1; char incomingByte = 0; void setup() { Wire.begin(); // join I2C bus as a Master Serial.begin(9600); Serial.println("Type something to send:"); } void loop() { void serialEvent() { // read one byte from serial port incomingByte = Serial.read(); // send the received data to slave Wire.beginTransmission(SLAVE_ADDRESS); Wire.write(incomingByte); Wire.endTransmission();
 { Wire.begin(); // join I2C bus as a Master Serial.begin(9600); Serial.println( Type something to send: ); } void loop() { void serialEvent() { // read one byte from serial port incomingByte = Serial.read(); // send the received data to slave Wire.beginTransmission(SLAVE_ADDRESS); Wire.write(incomingByte); Wire.endTransmission();")
20
2.程式碼(Slave) // slave_receiver.ino // Refer to the "master_sender" example for use with this #include <Wire.h> const int SLAVE_ADDRESS = 1; char incomingByte = 0; void setup() { Wire.begin(SLAVE_ADDRESS); // join I2C bus as a slave with address 1 Wire.onReceive(receiveEvent); // register event Serial.begin(9600); Serial.println("Received data:"); } void loop() { void receiveEvent(int howMany) { while (Wire.available()) // receive one byte from Master incomingByte = Wire.read(); Serial.print(incomingByte);
 { Wire.begin(SLAVE_ADDRESS); // join I2C bus as a slave with address 1 Wire.onReceive(receiveEvent); // register event Serial.begin(9600); Serial.println( Received data: ); } void loop() { void receiveEvent(int howMany) { while (Wire.available()) // receive one byte from Master incomingByte = Wire.read(); Serial.print(incomingByte);")
21
練習二多台 Arduino 間的通訊2 1.電路圖 2.動作說明 兩塊Arduino PIN13皆接一LED並串一電阻其餘同上題
兩塊Arduino上的LED會交互閃爍 Master端傳送布林值HIGH、LOW給Slave端,告知Slave端LED轉 態, Slave端使用Wire.onReceive()函數得知Master發送指令,並 以Wire.read()取得資料藉以改變LED狀態
函數得知Master發送指令,並 以Wire.read()取得資料藉以改變LED狀態.")
22
3.程式碼(Master) #include <Wire.h> const int SLAVE_ADDRESS = 1; const int ledPin = 13; void setup() { Wire.begin(); // join I2C bus as a Master pinMode(ledPin, OUTPUT); } void loop() { delay(delay_ms); digitalWrite(ledPin, HIGH); // turn on Master's LED digitalWrite(ledPin, LOW); // turn off Master's LED delay(400); slaveLED(HIGH); // turn on Slave's LED slaveLED(LOW); // turn off Slave's LED void slaveLED(byte value){ Wire.beginTransmission(SLAVE_ADDRESS); Wire.write(value); Wire.endTransmission();
 { Wire.begin(); // join I2C bus as a Master pinMode(ledPin, OUTPUT); } void loop() { delay(delay_ms); digitalWrite(ledPin, HIGH); // turn on Master s LED digitalWrite(ledPin, LOW); // turn off Master s LED delay(400); slaveLED(HIGH); // turn on Slave s LED slaveLED(LOW); // turn off Slave s LED void slaveLED(byte value){ Wire.beginTransmission(SLAVE_ADDRESS); Wire.write(value); Wire.endTransmission();")
23
3.程式碼(Slave) // Refer to the "blink_master" example for use with this #include <Wire.h> const int SLAVE_ADDRESS = 1; const int ledPin = 13; char incomingByte = 0; void setup() { Wire.begin(SLAVE_ADDRESS); // join I2C bus as a slave with address 1 Wire.onReceive(receiveEvent); // register event pinMode(ledPin, OUTPUT); } void loop() { void receiveEvent(int howMany) { // receive one byte from Master incomingByte = Wire.read(); // turn on or off LED according to the received data digitalWrite(ledPin, incomingByte);
 { Wire.begin(SLAVE_ADDRESS); // join I2C bus as a slave with address 1 Wire.onReceive(receiveEvent); // register event pinMode(ledPin, OUTPUT); } void loop() { void receiveEvent(int howMany) { // receive one byte from Master incomingByte = Wire.read(); // turn on or off LED according to the received data digitalWrite(ledPin, incomingByte);")
24
練習三多台 Arduino 間的通訊3 1.電路圖 2.動作說明 模擬Master向slave設備請求回傳資料 同習題一
Master 必須用 Wire.requestFrom() 發出 request 給 slave Slave 在收到 Master端requestFrom()的請求後,Slave端的 onRequest() 會由其參數呼叫對應函數,然後由函數把資料傳回 Master
 發出 request 給 slave. Slave 在收到 Master端requestFrom()的請求後,Slave端的 onRequest() 會由其參數呼叫對應函數,然後由函數把資料傳回 Master.")
25
3.程式碼(Master) #include <Wire.h> const int SLAVE_ADDRESS = 1; char incomingByte = 0; void setup() { Wire.begin(); // join I2C bus as a Master Serial.begin(9600); } void loop() { Wire.requestFrom(SLAVE_ADDRESS, 6); // request 6 bytes from slave while (Wire.available()) // slave may send less than requested { incomingByte = Wire.read(); // receive a byte Serial.print(incomingByte); // print the character delay(1000);
 { Wire.begin(); // join I2C bus as a Master Serial.begin(9600); } void loop() { Wire.requestFrom(SLAVE_ADDRESS, 6); // request 6 bytes from slave while (Wire.available()) // slave may send less than requested { incomingByte = Wire.read(); // receive a byte Serial.print(incomingByte); // print the character delay(1000);")
26
3.程式碼(Slave) #include <Wire.h> const int SLAVE_ADDRESS = 1; void setup() { Wire.begin(SLAVE_ADDRESS); // join I2C bus as a slave with address 1 Wire.onRequest(requestEvent); // register event } void loop() { // function that executes whenever data is requested by maste void requestEvent() Wire.write("hello\n"); // respond with message of 6 bytes // as expected by master
 { Wire.begin(SLAVE_ADDRESS); // join I2C bus as a slave with address 1 Wire.onRequest(requestEvent); // register event } void loop() { // function that executes whenever data is requested by maste void requestEvent() Wire.write( hello\n ); // respond with message of 6 bytes // as expected by master")
27
DS1307 Real Time Clock DS1307 時鐘用的正是 I2C 介面, 我們既可以用 Arduino 讀取 DS1307 的時間資訊: Wire.beginTransmission(DS1307_I2C_ADDRESS); // Open I2C line in write mode Wire.send(0x00); // Set the register pointer to (0x00) Wire.endTransmission(); // End Write Transmission Wire.requestFrom(DS1307_I2C_ADDRESS, 7); // Open the I2C line in send mode second = bcdToDec(Wire.receive() & 0x7f); // Read seven bytes of data minute = bcdToDec(Wire.receive()); hour = bcdToDec(Wire.receive() & 0x3f); dayOfWeek = bcdToDec(Wire.receive()); dayOfMonth = bcdToDec(Wire.receive()); month = bcdToDec(Wire.receive()); year = bcdToDec(Wire.receive()); 而且也可以設定它的時間: Wire.beginTransmission(DS1307_I2C_ADDRESS); // Open I2C line in write mode Wire.send(0x00); // Set the register pointer to (0x00) Wire.send(decToBcd(second)); // Write seven bytes Wire.send(decToBcd(minute)); Wire.send(decToBcd(hour)); Wire.send(decToBcd(dayOfWeek)); Wire.send(decToBcd(dayOfMonth)); Wire.send(decToBcd(month)); Wire.send(decToBcd(year)); Wire.endTransmission(); // End write mode
; // Open I2C line in write mode. Wire.send(0x00); // Set the register pointer to (0x00) Wire.endTransmission(); // End Write Transmission. Wire.requestFrom(DS1307_I2C_ADDRESS, 7); // Open the I2C line in send mode. second = bcdToDec(Wire.receive() & 0x7f); // Read seven bytes of data. minute = bcdToDec(Wire.receive()); hour = bcdToDec(Wire.receive() & 0x3f); dayOfWeek = bcdToDec(Wire.receive()); dayOfMonth = bcdToDec(Wire.receive()); month = bcdToDec(Wire.receive()); year = bcdToDec(Wire.receive()); 而且也可以設定它的時間: Wire.beginTransmission(DS1307_I2C_ADDRESS); // Open I2C line in write mode. Wire.send(0x00); // Set the register pointer to (0x00) Wire.send(decToBcd(second)); // Write seven bytes. Wire.send(decToBcd(minute)); Wire.send(decToBcd(hour)); Wire.send(decToBcd(dayOfWeek)); Wire.send(decToBcd(dayOfMonth)); Wire.send(decToBcd(month)); Wire.send(decToBcd(year)); Wire.endTransmission(); // End write mode.")
Similar presentations
 與 Flash 或 Processing…>")

>")


 Sensor-II>")


 Sensor-III>")
.>")

 李政澤(49937034) 曾群翔(49937057) 成員.>")
 小專題報告 紅外線感溫顯示器>")
